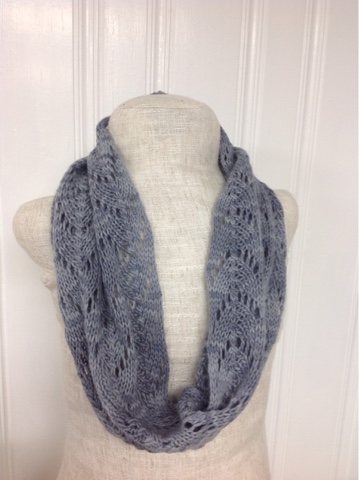
Berrylicious Infinity Scarf
This soft, simple stitch has a great drape. The bright pink color will add a pop of style to your outfit on any day.  I used 2 skeins of Vanna's Choice in Berrylicious with a J hook. This scarf is worked in the round, by joining each row without turning.
  The left side of this picture is the right side, and the right side is the wrong side. Confused yet? I like both sides, and may even like the wrong side better. My finished scarf is 9"x72".
  Enjoy!
Ch 141. Join without twisting.
Row 1: Ch 3, *dc2tog over next 2 chs, dc in last ch worked* repeat to end. Sl st in 3rd ch from beg ch 3.
Row 2: Ch 3, *dc2tog over next 2 sts, dc in last st worked* repeat to end. Sl st in 3rd ch from beg ch 3.
Repeat row 2 until out of yarn, or until desired width. Fasten off, and weave in ends.
Xoxo, Alyssa


pretty pretty pretty! love your scarf!
ReplyDeleteThank you!
DeleteAlyssa Titus
DeleteI'm confused bout this round 2-Row 2: Ch 3, *dc2tog over next 2 sts, dc in last st worked* repeat to end. Sl st in 3rd ch from beg ch 3.
Repeat row 2 until out of yarn, or until desired width. Fasten off, and weave in ends.
What do you mean by this..... thanks
So for row 2, you are going to dc2tog normally over two sts, but then you are going to dc in the second st of the dc2tog. Your repeat this all the way around, and join to the beginning ch 3 with a sl st. Repeat row 2 until your scarf is as large as you would like.
DeleteThank you for the pattern, will be making it for the DIL for Christmas.
ReplyDeleteI'm sure she will love it!
ReplyDeleteThanks for the pattern. It is beautiful
ReplyDeleteThank you!
DeleteGood Afternoon - I like your berrylicious infinity scarf enough to get started on making one immediately. However, I'm confused - dc2tog over next 2 chs, dc in last ch worked - I can't figure out what you mean by "last ch worked". Do I dc in NEXT ch after dc2tog?
ReplyDeleteYou dc in the second chain of the dc2tog. This way, no stitches are actually decreased.
Deletestill confusing to me
DeleteSo for the actual stitch pattern, just do a regular dc2tog over two consecutive stitches. Let's call the first st you go in 1 and the second, to complete the dc2tog, 2. After your dc2tog, in sts 1 and 2, dc in st 2. This makes it so the amount of sts stays the same throughout. It's kind of like having two sts in 2.
DeleteI am really looking forward to crocheting this! My dear friend and I are planning to crochet a couple of fun things together while she is in the process of moving and this is one of them. Thank you for sharing your pattern ~ sometimes you don't know what they mean to someone or how they are shared and it is one of the ways my friend and I will stay "close" while she is moving.
ReplyDeleteThat sounds great!
DeleteHi love the pattern. Try to start making it. Is it ch3, dc2tog, ch3 to the end. Sorry, beginner. Thanks
DeleteIt is ch 3 to start the round. Then for the rest of the round, it is dc2 tog, dc in last st worked.
DeleteWell-named, this scarf does look delicious!
ReplyDeleteWhat does dc2tog mean exactly? Both dc in same stitch with no chains between? Or one in 2 consecutive stitches?
Dc2tog as you normally would, over two consecutive stitches. Then you dc in the same stitch of the second half of the dc2tog.
DeletePretty scarf and I want to make it but the instructions are confusing.
ReplyDeleteEvery row is the same, the first is just worked into the starting chain. Dc2tog regularly, over two consecutive stitches. Then, in the second stitch of the dc2tog, dc. Then you repeat this for the rest of the row. Once you get started, this stitch is super simple.
DeleteBeautiful! Trying this out now. I always struggle with keeping the foundation chain from twisting. Any tips to this or is it possible to work this pattern back and forth and just join at the end? Also, if I wanted to make it a little longer what multiple would my foundation chain have to be?
ReplyDeleteAdd any multiple of two to make it longer. I have seem some people use clothes pins to help the foundation chain stay untwisted. To work this flat, you would do the same stitches, but do not sl st into the ch3. Then you would seam together at the end.
Delete"No, no, no, YES!" This is my inner dialog as I searched for the perfect scarf to crochet. This is IT. Very nice. Thank you for the pattern.
ReplyDeleteI hope you love your finished Berrylicious!
DeleteI love this pattern! Thank you for sharing. But using the J hook, 141 chains in the foundation row and Vanna's Choice yarn mine ended up only 7 1/4 inches by 58 inches - and that was even using a little from a third skein to finish off the last row. I also tried using a larger hook, added more chains to the foundation row, but then it would definitely take a lot more than the 2 skeins and actually seemed a little too heavy even without finishing it..... Yours is so beautiful and mine was a disappointment. I've been crocheting for over 20 years and most things turn out very close to size that pattern says. Any suggestions? Thanks!
ReplyDeleteI'm not sure why yours came out smaller than mine, other that maybe you crochet tighter than I do. I would say add more chains at the beginning-add any multiple of 2. You may have to use an entire third skein if you do want it longer.
DeleteThe scarf is beautiful and I really would like to give it a try! However, all my computer is giving me is the comments, but not the pattern. Is there a place where I am supposed to click on the icon? (I clicked on the pattern directions and the comments is all I got.) I'd appreciate your assistance!
ReplyDeleteI'm not sure why you can only see the comments. The pattern should be above these comments. If you look at the left sidebar on this blog, you should see this scarf as one of the top patterns. Maybe try clicking that to see if the pattern comes up?
DeleteHi Alyssa
ReplyDeleteI love this pattern and have linked back to it on my blog, could you let me know if I can sell finished items as long as all design credit is given to you?
Many thanks
Helen
That's okay with me!
Delete